
After our great experiences with the Nuvo cabinet paint and the Rustoleum Cabinet Transformations, another DIY kitchen remodeling project came our way, when we saw the heavily scuffed, stained, chipped and forlorn laminate countertop at our daughter’s.
We were itching to rescue another kitchen and agreed to be the superheroes who do it, at the drop of a hat.
To be fair, after the fantastic remodel project with the cabinets, my daughter was more eager than us to redo the countertop.
So, a week later, on a nice and sunny morning, we rang her doorbell with the Rustoleum Countertop Transformations Kit in tow. We had done the homework, bought the extras that are not included in the package (more on this later) and also done the necessary prep work.
Out went the kids leaving the home all alone for us to work our magic.
Here’s our complete Rustoleum Countertop transformations review.
What is Rustoleum Countertop Transformations?

Rustoleum countertop paint is a countertop resurfacing DIY kit that is sold under Rustoleum’s ‘Transformation’ range of products.
It allows you to resurface your old, worn out countertop by applying four layers of different materials to it.
Note that we mentioned its resurfacing?
This isn’t one of those paint-on kits that allow you to paint over the counter and then use an epoxy coating to seal it in.
Instead, you will sand away your old countertop, apply a layer of adhesive, a synthetic wetting agent to keep the adhesive wet as you apply the next layer which is a solid decorative layer and lastly, a top clear coat for a shiny new finish.
It is available in five color choices. These are desert sand, onyx, java stone, charcoal and pebbled ivory.
The task is a little tedious because there’s a lot of sanding and taping involved in the prep work and also after you apply the solid layer. So, if you intend to go at this alone, ensure that you have the entire day at your hands.
Does It Work On All Countertop Surfaces?

It’s mentioned on Rustoleum’s website that with proper preparation, the Rustoleum countertop kit can be used to resurface laminate, hardwood and metal trim surfaces.
Preparation stands for thorough sanding of the old countertop surface and ensuring that the adhesive glue layer is properly adhered to the surface before you proceed with it.
Giani vs Rustoleum Countertop Kit


It would be impossible to write a detailed Rustoleum countertop paint review without drawing parallels with the Giani Granite DIY kit.
To be fair, we haven’t had a chance to use that kit yet.
But from what we’ve heard from DIY ninjas and customers who have used it, the Giani Granite DIY Kit looks stunning if it is applied correctly.
However, application is far from a cake walk. It’s a paint kit after all and how well you paint, especially near the edges and the sink is subjective. So, the results might depend on your skills.
Also, the final step involves applying a top coat of Polyurethane which might take weeks or even months to cure completely at room temperature. In colder places, it might take longer. During the curing phase, the countertop may be prone to injures.
So, from all that we’ve heard so far, Rustoleum seems like a much safer bet.
Top Rated Rustoleum Countertop Transformations Kit Colors
How to Apply Rustoleum Countertop Paint?
It’s a fairly easy process because most of the things you need are included in the kit. The additional stuff that you’ll have to source from home or buy separately are gloves, goggles, a mask (highly recommended), roller, brushes, painters tape and some trays.
Once you have everything lined up, unbox the kit and you’ll notice that everything is layered for your convenience.
- Watch the instructional DVD. Then watch it again just to be sure that you understand every step correctly.
- Use the diamond-embedded sanding tool included in the kit to sand the countertop surface. Now, Rustoleum claims that the tool contains real diamonds which we seriously doubt. As part of our prep, we’d also tagged along with an orbital sander with medium grit sandpaper. This worked a lot faster than the diamond thingy. Anyway, sand away until the surface is scrubbed and ready.
- Use painters tape and tape off the entire kitchen.
- It’s time to apply the base coat or the adhesive. Use the roller brush and apply it evenly. This step is crucial in ensuring that you get an even finish. So, take your time with it. The adhesive itself has a tar-like consistency and is a water based one. We had no problems whatsoever finishing the application in an hour.
- As part of the prep for the next two steps, get everything ready. Collect the solid chips in the dispenser or spreader or whatever you call it.
- Now, use the sprayer and spray on the wetting agent. This ensures that the adhesive doesn’t go dry. Once again, fairly simple.
- This is the only step that’s a little tricky. Go ahead and spread the chips evenly on the counter surface. This is what gives the countertop, that natural stone finish and by the time you finish a small portion, you should feel like an expert at this.
- Use the scraping tool (not the diamond sander thing) to scrape away any excessive chips that may be protruding.
- Now use the diamond sander to sand away the surface to an even and smooth finish.
- Lastly, go ahead and apply the silicon epoxy top coat that gives it a shiny and glossy finish. This dries completely in about 48 hours and cures in less than a week. The top coat is chemical, UV, water, stain resistant. It does not yellow, is odor free and is impervious to mold and bacteria
Our Rustoleum Countertop Transformations Review
- Ideal for use on a variety of countertops in homes including the kitchen and bathroom
- Easy to use with no special skills required; complete step-by-step instructions included
- Covers up to 50 square feet or 20 linear feet
- Durable surface that will last for years
- Premium natural stone look and professional looking results
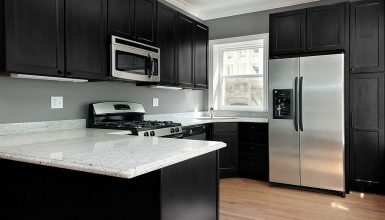
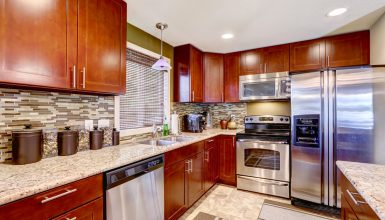
It’s been four weeks since we applied the Rustoleum Countertop transformations kit and it has cured completely. The surface looks sparkling new and most people who’ve seen it have felt that it’s a new granite counter and not a DIY remodeling kit.
We will post an update on how well it holds up in the months to come.
Pros
- Completely changes the look of the countertop in less than $100
- One kit covers 50 feet of countertops
- Two people can finish the whole job in less than a day
- Reasonably easy to apply
- Five color choices to blend with your cabinets
- Looks amazing
- Extremely durable top coat
Cons
- The sanding can be tiring especially if you are doing this alone. Get an extra pair of hands.
- You have to use the chips. If you were seeking a one-tone for your kitchen, then this might not be the best of choices for you.
Conclusion
We are highly impressed with Rustoleum’s transformation range of products. Both the cabinet and countertop transformations have worked tremendously well for us.
Image credit: Wovenbywords


